The "Astroliner" is a Vintage Style Camper Project from the creative minds of Michael Adams and Carrie Monnier. Special mention to Matt Adams for his puzzle solving abilities, endless patience and the gracious use of his shop for months on end.
Thank you for visiting our site. If this is your first time here, please start at our "Humble Beginnings" located under the Blog Archive on the left side of the page...
Welcome To Our Build!
December 28, 2016 Here we are at the end of 2016 and we hope you all had a Merry Christmas and Happy Holidays! This will be our last post for the 2016 year as we look forward to 2017 and more camper building! We finally have the exterior buttoned up and all the exterior lighting is wired and functional. One of the last bits we finished was the porch light over the door. The LED's are bright and it looks like it will do the job perfectly!
Next we move on to the interior.
Since the bed is at the back of the coach, everything builds off of it. So we started with the bed and the framing.
The space under the bed will provide a lot of storage and has access from both the interior and through the exterior hatch. The finishing piece is the Birch for the face. After quite a bit of indicision and research, it was decided we would go with old school Lacquer for the finish. The reasons for going with Lacquer were: a.) We wanted to be able to spray the finish rather than brush it b.) We wanted a finish that would age gracefully and naturally to a beautiful amber color just like the vintage coaches c.) We like the way Lacquer can be sanded and buffed to perfection. Here is the final piece after the Lacquer has been applied, sanded and buffed. It looks like a piece of furniture.
Here it is installed:
Now that the bed is in place, it is time to start designing the walls. We began with the floorplan that Carrie scaled to size And we transfered the lines onto the floor with tape so we know where the walls go If you think the lines look angled you're correct! We have decided on angled walls and lines to optimize space and create something a bit less "conventional." We're hoping in the end it will be fabulous! Now we're ready to start installing "cleats" or attachment points on the floor, walls and ceiling. We're not quite there yet, but in the meantime, here's a couple pictures of the new interior lighting that we installed... And lit...
And the pendant for over the dinette...
That's about all the time we have for now! See you again after the first of the year! Until then, Happy Creations! Michael and Carrie
Up until this post, we have been trying to catch our blog up to the actual build. Well, here we are. All caught up and blogging in real time. We would like to take this time to thank the people who follow this blog and find it interesting. As of this moment we currently have over 48,000 views on our build journal and blog followers from at least 18 different countries! That's pretty exciting to us! The Countries currently represented are: The United States, Canada, (Hi Oleg!) Belgium, New Zealand, (Hey Sheddie!) The United Kingdom, Korea, Russia, Australia, (Hello Dale!) France, Romania, Brazil, Norway, Ireland, (Hi Larry!) Turkey, Philippines, Chili and Singapore! Thank you all again for your interest and inspiration! We had no idea this build would connect us to so many amazing people and places! Wow! When we left off the coach was in primer. What a great feeling to have the fiberglass work finished up and the shell looking complete! We had originally planned to do all the paint work at the very end to protect it from any boo-boo's. At this stage in the game we are tying up Matt's shop with a camper that cannot be pulled outside for lack of being weather tight. If something doesn't change we fear we will wear out our welcome. Therefore, the decision has been made to lay down a coat of base, protect it with some intercoat clear and go ahead with the installation of all the windows, doors, hatches, fans, lights and so on. This way, there will be paint under all the bits and pieces and the coach will be sealed up and weather tight so it can go outside no matter what the weather. Let's lay down some silver base and intercoat clear...
The roof of the coach will be wrapped in a vinyl wrap so it doesn't get painted. The wrap will complement the rest of the coach and have a vintage vibe. More on that to come... Next, we began to install all the parts. Little by little she's really beginning to look like a real camper! Front window... Side Window... Rear windows... Hatches and Marker Lights... Taillights...
So yeah, go ahead and check this out!
Rear Side Window, Water Hook Up's, Electrical Hook Up, Shower and Fenders... Entry Door... Roof Vents and Fans... Now that she is all sealed up, the coach can safely sit outside regardless of the weather with no worry, instead of just taking up shop space. Here's what the coach looks like now:
We're all caught up in real time... So stay tuned for more updates, follow us and feel free to ask questions or comment! Until next time... Happy Creations! Michael and Carrie
Winter 2015 into Spring 2016... Now that the exterior of the coach is in primer, it's time to move on to the inside and begin working on the walls. Something we did very early on when we cut out the wall panels, was to cut identical panels to use as interior walls at a later date. Each piece would need some minor modifications to get them to fit just right, which was something Carrie handled very well. Every piece ended up fitting like a glove. Here are all the interior pieces after they were cut, fit, sanded and ready for finishing. Now it's time to prep the wall panels for paint. Typically, in a vintage camper the walls would be stained and varnished. We decided to go for something with just a little more flair... Flake! So in order to do this, I had to fill any imperfections in the wood with body filler, then follow with multiple coats of primer. This is a long, tedious process because the wood will fight it all the way. But once it's done it's very worth it! Here are some of the panels in primer.
For the paint, we wanted really "old school cool" flake from the '60's and 70's. So we landed on a fantastic flake made by Big Daddy Roth's son, 'Lil Daddy Roth. We agreed that I would pick the color for the Main Cabin... "Tropi Cali Orange!"
And Carrie would pick the color for the Captains Quarters... "Rattsberry!" For all the walls that will be behind cabinetry or seating we went with black flake. If all this doesn't scream Vintage '60's HotRod I don't know what does! Here are the panels all decked out in Fabulous Flake!
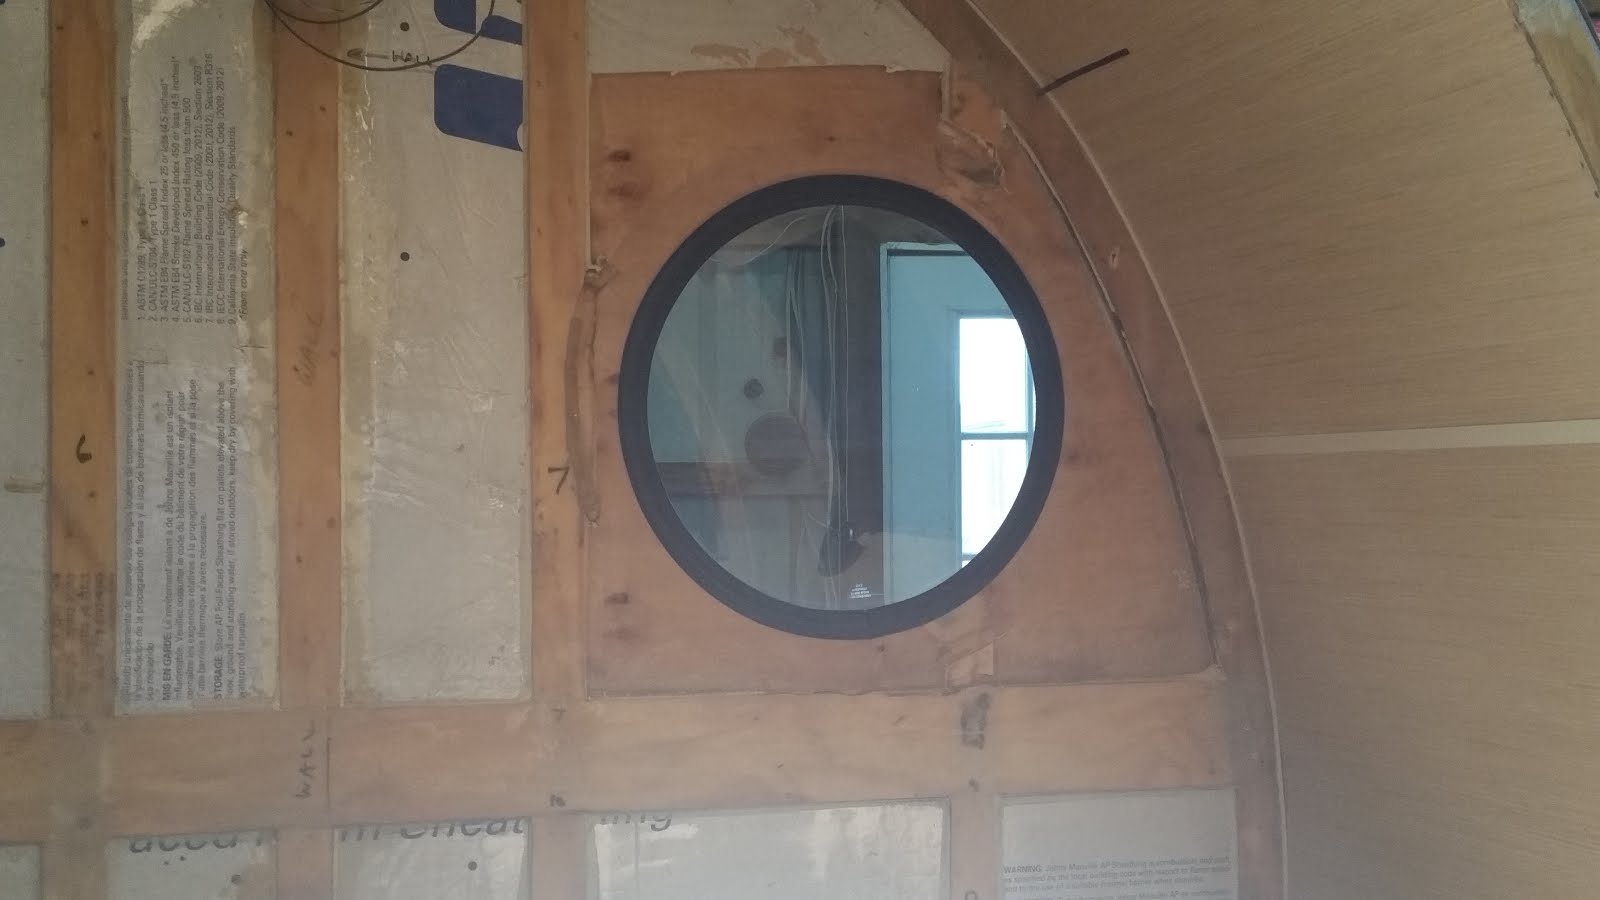
The wall panels are now complete and it is time to ready the interior for installation. We realized the port-hole windows must be installed prior to the walls going in, so that became the next focus. Since the windows are custom-fab and one-off, the learning curve was steep. With a few trial and error attempts we figured out a system and got both windows installed.
Wood support rings were cut and bonded into place with epoxy for added support and attachment points for the new walls.
Here are the windows installed...
Even better than we imagined! And then, the walls went in. One pretty piece at a time. We didn't want to drill holes or use any type of nails or fasteners (that's been the theme of this build anyway) so the wall panels were installed with 3M brand VHB tape. If you have never used this stuff, try it. It's a truly amazing, permanent bond. We always warm the VHB tape with a heat gun to soften the glue just before installing the part. This makes it even more permanent!Also, installing the panels was a bit tricky because all the corner trim had to be installed simultaneously as the walls went in. We think the end result is fabulous!
Keep in mind that no two panel colors will ever be seen together because of the birch walls and cabinets that will be installed later. As a final touch, custom made trim rings were cut, sanded, painted and installed around the port-hole windows.
And that's about it for the Fabulous Flake! Stay tuned for more upcoming fabulousness! As always, thank you for following our build. We appreciate each of you who find us interesting. And a special shout out to our one follower in Russia who reads our blog each time it comes out! We thank you for your interest! Please comment, we would love to hear from you! Happy Creations! Michael and Carrie